Add your Items

The first step to Getting Things Done® is to add your items to Nirvana. We’ve got some handy videos in our Quick Guide to set you up quickly, but this chapter will explain a few extra ways to capture your stuff.


Quick-add new items

Add items to the current context

Using the mobile app, tap the to add a new item.

Using the web app, click New Item at the top-left of the page or use keyboard shortcut N to add a new item. You might also want to check out Rapid Entry for another quick way to add items and details.

Good to know: This will create a new item at the bottom of the current list. For example, if you’re in the Projects list, you’ll get a new project. If you’re in References, you’ll make a new reference list, and so on. The item will also contain any tags being used to filter the current view. For ways to create different types of items, keep reading.

Quick-add items to the Inbox

Suddenly have a thought to add to your Inbox? You can do it quickly without even looking away from your current list.

Using the mobile app, long-press the in any list.

Using the web app, use the keyboard shortcut I.
Create Inbox items via email

You can generate items in your Nirvana Inbox by sending an email to the mailbox assigned to your account. Here’s how:

Find your personal Inbox address

Try your personal Inbox address

  1. Click the linked email address from the previous step to create a test email using your mail application.
  2. Send it and you’ll notice that the subject of the email becomes the task name, while the contents become the notes.

Remember that you can send text information to your Inbox, but images and other files will be stripped.

Forward and BCC emails to Nirvana

If you want someone to be able to generate tasks in your Nirvana Inbox, you can set up a rule to forward certain types of email to your personal Inbox address. This will give others the ability to send you a task without giving them your private Nirvana address.

If you want to send a task to your Inbox when emailing others, you can send a blind carbon copy (BCC) to your personal Inbox address.

Remember to keep your personal Nirvana Inbox address private. It can’t be changed and anyone who knows it has the power to add tasks to your Nirvana Inbox.

Copy items with the web app

Copying an item allows you to use it as a template, or to convert a duplicate to another type of item. (If you want to create multiple copies of an action, you might want to try creating a recurring task.)

Copy an item

  1. Right-click on the item or click the drop-down arrow at the right end of the item entry.
  2. Select Make a copy… from the context menu.
  3. You’ll create an exact copy of the item underneath the original.

Use a copied reference list as a project template

Since you can convert reference lists to projects, you can use these as basic project templates.

  1. Create a reference list as a template.
  2. Follow the steps above to make your copy.
  3. Right-click on the new reference list, or drop-down arrow at the right end of the item entry.
  4. Choose Convert from the context menu, followed by Project.
  5. Go to the Projects list and check it out. You can now add details such as state, due date, energy, time, and start date to the items.

Add items with keyboard shortcuts

Using the web app, exit any tasks you’re editing and remove focus from Rapid Entry (if you’re using it) by clicking any list or hitting Esc. You can now use shortcuts to create the different items.

In most cases, the newly created item will contain the tags that are currently being used to filter items.

Type Shortcut Condition
New Item (Bottom) N This will create a new item at the bottom the current list.
New Item (Top) Shift + N This will create a new item at the top the current list.
New Item (Middle) Shift + Click Create new items in the middle of a list by shift-clicking on an existing item entry’s whitespace. A new item will be inserted just above the one you clicked.
New Inbox Action I This can be used from any list to create a new Inbox item. It will not contain any tags unless you add them.
New Next Action X In most lists, this will create a new action at the bottom of the Next list. From within a reference list, it will create a reference item.
New Waiting Action W In most lists, this will create a new action at the bottom of the Waiting list. Click on “Waiting for Someone” followed by “Waiting” to choose your contact. You can also save the item as is to assign it to “Someone” for now. From within a reference list, it will create a reference item.
New Scheduled Action S In most lists, this will create a new action in the Scheduled list. By default, it will be scheduled for the next day. To choose another date, click on “Scheduled” and choose the start date. From within a reference list, it will create a reference item.
New Someday Action Y In most lists, this will create a new action at the bottom of the Someday list. From within a reference list, it will create a reference item.
New Focus Action F In most lists, this will create a new Focused Next action. From within a reference list, it will create a focused reference item.
New Standalone Action Shift + X/W/S/Y/F In a project or reference list, this will create a standalone action in the lists described above.
New Project P This can be used from any list to create a new project.
New Reference List L This can be used from any list to create a new reference list.
Save an Item Enter Hit this while editing the item name to save the item.
Save an Item (from any text field) Shift + Enter This will save the item you’re working on regardless of the field you are currently editing.

Good to know: There are more timesavers in our general Keyboard Shortcuts list and our batch editing article.

Use Rapid Entry

With Rapid Entry, you can quickly add tasks in the web app without moving your mouse.

Basic Rapid Entry use

  1. To start, use the keyboard shortcut Shift + E or choose to show Rapid Entry from your preferences. You’ll see a line appear above the top item in every list.
  2. Click the line or hit E to focus on it, type your item title, and press Enter. Your new task will be added to the bottom of list. Keep typing and pressing Enter until your mind is clear again.

Good to know: You can press Shift + Enter to add items to the top of the list instead of the bottom.

Add properties with Rapid Entry

In addition to creating basic entries, you can also add tags and certain properties using Rapid Entry. Just follow the order below:

  1. Type the name of the item.
  2. Add tags by preceding them with a hashtag # . This feature is available only for tags that do not contain spaces. Tags are also case sensitive, so watch out for that Shift key. If you type a new tag, it will added as a label, but you can change the type of tag later.
  3. Add a due date by typing #due , a space, and a valid date (such as January 10, mm dd, mm dd yy), “today”, “tomorrow”, or an upcoming day of the week.
  4. Add a focus star by typing #focus or #star .
  5. If you’re in the Inbox, you can add the item to certain lists by typing #next or #someday .
  6. Make your entry a project by typing #project .
  7. Press Enter / Shift + Enter and your item is created.
  8. If desired, press Esc to remove focus from the Rapid Entry line or Shift + E to hide it.
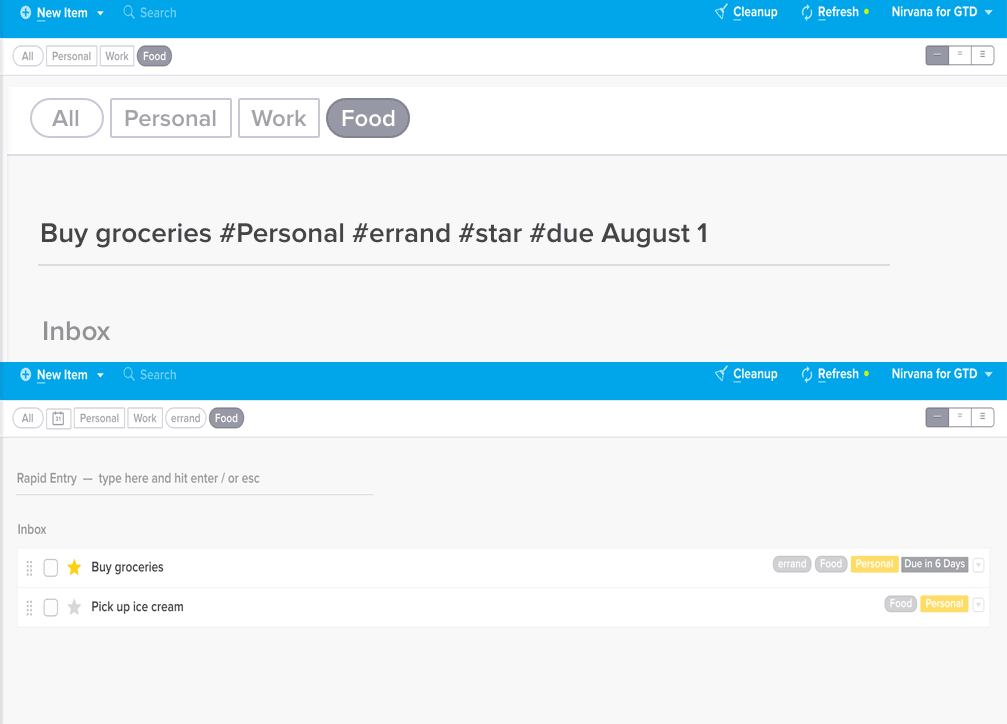
example of rapid entry text and result

In this example, the entry “Buy groceries #Personal #errand #star #due August 1” will create the focused task “Buy groceries” with a due date of August 1st and the tags “Personal” and “errand”.

Good to know: Tags are automatically added if your current view is filtered. In the example above, the Inbox was filtered for “Food”, causing the new entry to also contain this tag.