Once you complete a project or action, it moves to the Done group within your list. If you’d like to clear up your view, you can:
OR
If you’d like your completed items to automatically move to the logbook, just select this option from the settings.
Actions that are part of an incomplete project will remain in its Done group even when they are collected to the logbook. This allows you to keep track of all of the actions involved in completing your project.
If you don’t want to see them, click on Done to hide the actions.
Once the project is completed, the collected actions will stay in the logbook.
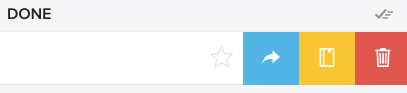
You can undo a completed action or project. How you restore it depends on the type of item, whether you’re using the web or mobile version of the app, and whether the item has been moved to the Logbook or not. Here are the steps to follow depending on your situation:
If the action is still in the Done group of the list, simple uncheck it from there.
If the action is in the Logbook:
If the project is still in the Done group of the Projects list, uncheck it, followed by any applicable project actions.
If the project is in the Logbook:
If the action hasn’t been logged, uncheck the action from the project’s Done group.
If the action has been logged, it will be visible in the project’s Done group until the project itself has been logged.
If you don’t want a record of a completed task, or you decide you’re never going to do an action, the trash may be a good place to put it. However, if you want to be able to keep track of past items, it’s worth learning about the logbook. If you think you still might do the action at some point in the future, the Someday list may be useful to you.
You can move items to the trash in much the same way you would move them to other lists.
To delete an item using the web app, just drag the item to the trash . If you want to delete multiple items, lasso them first, then drag.
To delete an item using the mobile app, swipe the item to the left and tap the red trashcan .
As long as you haven’t emptied the trash, you’ll still have access to the items stored there. However, the items will no longer be attached to their project, reference list, or state (meaning, for example, scheduled dates will be removed).
To bring them back from the trash using the web app, drag the item to the desired list.
To bring them back using the mobile app, swipe the item to the left, tap the curved arrow and select the desired list.
If you completed the item before deleting it, it will appear in the Done group of your chosen list when it is taken out of the trash. From there, you can decide to restore it or bring it to the logbook.
As mentioned above, your deleted items will stay put until you empty the trash. Once you choose to empty the trash, they won’t be part of any data you export. They will be gone.
To empty the trash, click on the Trash list in the left navigation menu, followed by Empty Trash (near the top-left in the web app and near the bottom in the mobile app).
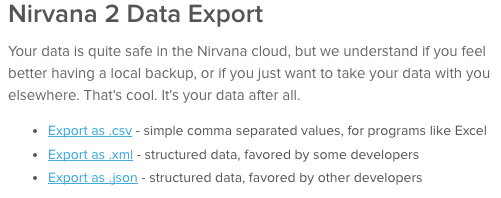
Good to know: This lets you access more of your history than available in the logbook. It will give you all of the data from your account except for what you’ve emptied from your trash.
Using the web app, you can easily email actions, projects, reference lists, or reference items. To do this, right-click the item you want to send and choose Email this… from the drop-down menu.
Depending on what you’re sending, you’ll create a blank email with either:
Good to know: When an action is waiting on a contact, using this feature will populate the email with their address. Find out more about adding contacts to tasks here.
Using the web app, you can print using the browser print function, typically CTRL + P or CMD + P .
This will print your current view within Nirvana, so adjust the filters and display options prior to printing.
This option allows you to print your entire record or selected data.
You can easily get and manipulate item text by using email.
You can link to documents, launch webpages or applications, send emails, and call phone numbers from Nirvana. To do this:
You can see the process in the video below.
Here are a few tips to help you make the most of different types of links:
Nirvana assumes you’re using http or https as a protocol in your links. If you need to access another protocol, such as FTP, make sure it’s written at the beginning of the link.
These work just like web links. If you use a cloud-drive type service (e.g. Google Drive, OneDrive, etc), create a link to the file or folder and add it to the notes section of your item. Click the link and the file or folder will open.
Click directly on the number to make your call via mobile phone or any click-to-call extension installed on your web browser. Phone numbers are clickable with the following formats: 1-123-123-1234, 1 123 123 1234, (123) 456-7890, 123 456 7890, or 123-456-7890. You can also use dots in place of dashes.
To launch a blank email, add the address to the notes. Click the link to launch your email client.
Logging in should be a snap. Check these steps:
You will generally remain logged in to Nirvana on your app or browser until you log out. If not, there are a few things you can try:
If you’ve tried the above and you’re still getting the bump, please contact us with the relevant email address or username, as well as the device(s) on which you’re having the issue. We’re happy to help.
Un-paused recurring tasks are generally the culprits in this scenario. To solve the issue:
Good to know: If you want to permanently delete a recurring task cycle before its end date, you should first pause it, then move the cycle to the Trash.
If you’ve tried this and you’re still seeing deleted tasks in your lists, please contact us with the name of the tasks and where you’re seeing them. We’re eager to help out.


GTD® and Getting Things Done® are registered trademarks of the David Allen Company. Nirvana is not affiliated with or endorsed by the David Allen Company. © 2025 Nirvana HQ Inc. See our Terms of Use and Privacy Policy. Made by PeopleLikeUs.
Terms of Use | Privacy Policy